
In this deep-dive guide, I’ll show you how to set up a Hybrid Cloud for a real company. I’m going to use my xenappblog LLC as an example and record training videos for the Automation Framework Community Edition at the same time. It’s a long article so the Table of Contacts on the right will definitely come in handy 🙂
Hardware and Prerequisites
The hardware is Supermicro E200-8D with 128 GB, 32GB SATADOM and two Samsung 970 EVO Plus SSD 1TB – M.2 NVMe (adapter needed). The price is $1650 without storage. For the hypervisor, I’m using Nutanix Community Edition 2019.11.22 which is the first version to support All Flash.
I’m not going to show you the Nutanix CE setup, that has already been covered by fellow Nutanix NTC Patrick Damen in this amazing blog post series. He is using the same hardware as me and goes really deep dive.
The prerequisite going forward is a VM running with my Automation Framework Community Edition (AFCE) which has FREE Training Videos.

For this environment I’m going to leverage Server Core for as many supported services as possible. First out is two Domain Controllers which will also be running DHCP Failure. The hardware configuration is 2 vCPU / 2GB / 40 GB. If you want to go the same route, remember to change the Operating System to Server Core.

AFCE automatically let you deploy Domain Controller and Additional Domain Controllers fully automated. It even setup PKI and export the domain wildcard certificate to pfx, crt, pem and key file format.

Setting Up Remote Access with 2-factor authentication and DHCP Failover
With the Domain Controllers running on Server Core and a temporary Hydration server for deployment only, we’re going to setup Remote Access first using Parallels Remote Application Server (PRAS).

Don’t worry, we will be setting up a full Citrix Hybrid Cloud solution, but I need something for Remote Access today and I also like to have a fall back solution.
The PRAS infrastructure (PRAS-01) will be running on Server Core with 2 vCPU / 2GB / 40 GB. The RDSH Worker (PRAS-WS19-01) will be running Server with Desktop Experience with 2 vCPU / 4GB / 60 GB.
From the Hydration Server make changes to the configuration file located in C:\Source\Examples\Parallels to reflect your environment. For more information check the blog post Prevent RDP Hacking in 2 Minutes with OTP.
|
1 2 3 4 5 6 7 8 9 10 11 12 13 14 15 16 17 18 |
Set-NetFirewallProfile -Profile Domain -Enabled False $Server = "YOURINFRASERVER" $User = "administrator@YOURDOMAIN" $Pwd = "YOURPASSWORD" $Password = ConvertTo-SecureString $Pwd -AsPlainText -Force $Email = "PARALLELS ACCOUNT EMAIL" $EmailPwd = "PARALLELS ACCOUNT PASSWORD" $EmailPassword = ConvertTo-SecureString $EmailPwd -AsPlainText -Force New-RASSession -Username $User -Password $Password -Server $Server $RDS1 = New-RDS -Server "YOURWORKERSERVER" $RDSList = Get-RDS New-RDSGroup -Name "Windows 2019 RDS" -RDSObject $RDSList Set-RDSDefaultSettings -MaxSessions 100 -EnableAppMonitoring $true New-PubRDSDesktop -Name "Desktop" Set-RASTurboSettings -Enable $False Set-2FASetting -Provider GAuthTOTP Invoke-LicenseActivate -email $Email -Password $EmailPassword Invoke-Apply |
Open a RDP session to PRAS-01 and type WhoAmI to make sure you’re logged in as Domain Administrator. Type PowerShell.

Now copy & paste the customized Parallels configuration above.

To logoff the Server Core session type sconfig and then 12.
Finally download, install and open the Parallels Client to scan the QR code into Google or Microsoft Authenticator (after authentication).
If you’re so lucky to have a UniFi Secure Gateway (USG) simply head over to Settings – Routing & Firewall – Port Forwarding. It’s that easy.

I found that the USG DDNS reports the internal IP address of the ISP modem, so I use Dyn.com and their Dyn Update client running on my Office PC to always update my DNS record with my external IP address.
The final part is to configure DHCP Failover. Open a RDP connection to PRAS-WS19-01 and install DNS RSAT Tools and connect to DC-01 and DC-02.

First of we need to right click DC-02 and Authorize it. Second expand IPv4 on DC-01 and click Scope Options. Double click 006 DNS Servers to add the 2nd DNS server.
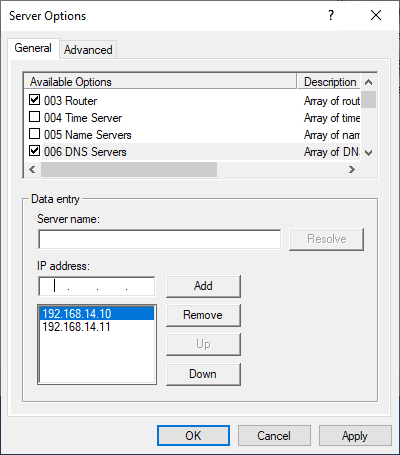
Right click IPv4 on DC-01 and select Configure Failover.

Click Next

Add DC-02 and click Next.

Set the Mode to Hot standby – Standby and type in a Shared Secret.
- Load balance mode (Both DHCP servers are active and the load is shared among the two).
- Hot standby mode (One of the DHCP servers is active and the other is passive. When active goes down, passive takes over and becomes active).

Click Next – Finish.

You’ve now successfully setup a DHCP Failover.

You can verify that it’s working by selection Address Leases on DC-02.

Group Policy Central Store, WinRM, ControlUp and LAPS
Setting up Group Policy Central Store, enable Windows Remote Management (WinRM), install and configure ControlUp and Local Administrator Password Solution (LAPS) when building a Hybrid Cloud.
To take advantage of the benefits of .admx files, you must create a Group Policy Central Store in the SYSVOL folder on a Windows domain controller. The Central Store is a file location that is checked by the Group Policy tools by default. The Group Policy tools use all .admx files that are in the Central Store. The files that are in the Central Store are replicated to all domain controllers in the domain.
Copy the folder C:\Windows\PolicyDefinitions to \\FQDN\sysvol\FQDN\Policies. You can verify it working by opening the Group Policy Management Console.

Next we’re going to create a Group Policy to allow for Windows Remote Management. I’m going to name it Global CC – WinRM.
Go to Computer Configuration – Policies – Administrative Templates – Windows Components – Windows Remote Management (WinRM) – WinRM Service. Double-click Allow remote server management through WinRM and set it to Enabled as shown below.

Go to Computer Configuration – Preferences – Control Panel Settings –Services and choose New – Service. Choose Automatic (Delayed Start) as startup type, pick WinRM as the service name, set Start service as the action.

Go to Computer Configuration – Windows Settings – Security Settings – Windows Defender Firewall with Advanced Security and browse down to Inboud Rules. Right-click to create a New Rule.

|
1 2 |
Test-NetConnection -ComputerName DC-02 -Port 5985 Enter-PSSession -CoomputerName DC-02 |

Next up is the ControlUp Console which you can automatically download and install using my Github code.
|
1 2 3 4 5 6 7 8 9 10 11 12 13 14 15 16 17 18 19 20 21 22 23 24 25 26 27 28 29 30 31 32 33 34 35 36 37 38 39 40 41 42 43 44 45 46 47 48 49 50 51 52 53 54 55 56 57 58 59 60 61 62 63 64 65 66 67 68 69 70 71 72 73 74 75 76 77 78 79 80 81 82 83 84 85 86 87 88 89 90 91 92 93 94 95 96 97 98 99 100 101 102 103 104 105 106 |
# https://github.com/BronsonMagnan/SoftwareUpdate/blob/master/ControlUpAgent.ps1 function Get-CurrentControlUpAgentVersion { [cmdletbinding()] [outputType([version])] param() $agentURL = "http://www.controlup.com/products/controlup/agent/" #ControlUP forces TLS 1.2 and rejects TLS 1.1 [Net.ServicePointManager]::SecurityProtocol = [Net.SecurityProtocolType]::Tls12 $webrequest = wget -Uri $agentURL -UseBasicParsing $content = $webrequest.Content #clean up the code into paragraph blocks $paragraphSections = $content.replace("`n","").replace(" ","").replace("`t","").replace("<p>","#$%^<p>").split("#$%^").trim() #now we are looking for the pattern <p><strong>Current agent version:</strong> 7.2.1.6</p> $versionLine = $paragraphSections | where {$_ -like "*Current*agent*"} $splitlines = ($versionLine.replace('<','#$%^<').replace('>','>#$%^').split('#$%^')).trim() $pattern = "(\d+\.){3}\d+" $version = [Version]::new(($splitlines | select-string -Pattern $pattern).tostring()) Write-Output $version } function Get-CurrentControlUpAgentURL { [cmdletBinding()] [outputType([string])] param( [validateSet("net45","net35")] [string]$netversion = "net45", [validateSet("x86","x64")] [string]$architecture = "x64" ) $version = Get-CurrentControlUpAgentVersion $DownloadURL = "https://downloads.controlup.com/agent/$($version.tostring())/ControlUpAgent-$($netversion)-$($architecture)-$($version).msi" Write-Output $DownloadURL } function Get-CurrentControlUpConsoleURL { [cmdletBinding()] [outputType([string])] param( [validateSet("net45","net35")] [string]$netversion = "net45", [validateSet("x86","x64")] [string]$architecture = "x64" ) $version = Get-CurrentControlUpAgentVersion $DownloadURL = "https://downloads.controlup.com/console/$($version.tostring())/ControlUp.zip" Write-Output $DownloadURL } # PowerShell Wrapper for MDT, Standalone and Chocolatey Installation - (C)2015 xenappblog.com # Example 1: Start-Process "XenDesktopServerSetup.exe" -ArgumentList $unattendedArgs -Wait -Passthru # Example 2 Powershell: Start-Process powershell.exe -ExecutionPolicy bypass -file $Destination # Example 3 EXE (Always use ' '): # $UnattendedArgs='/qn' # (Start-Process "$PackageName.$InstallerType" $UnattendedArgs -Wait -Passthru).ExitCode # Example 4 MSI (Always use " "): # $UnattendedArgs = "/i $PackageName.$InstallerType ALLUSERS=1 /qn /liewa $LogApp" # (Start-Process msiexec.exe -ArgumentList $UnattendedArgs -Wait -Passthru).ExitCode Write-Verbose "Setting Arguments" -Verbose $StartDTM = (Get-Date) $Vendor = "SmartX" $Product = "ControlUp Console x64" $Version = "$(Get-CurrentControlUpAgentVersion)" $PackageName = "ControlUpConsole" $InstallerType = "zip" $Source = "$PackageName" + "." + "$InstallerType" $LogPS = "${env:SystemRoot}" + "\Temp\$Vendor $Product $Version PS Wrapper.log" $LogApp = "${env:SystemRoot}" + "\Temp\$PackageName.log" $Destination = "${env:ChocoRepository}" + "\$Vendor\$Product\$Version\$packageName.$installerType" $UnattendedArgs = "/i $PackageName.$InstallerType ALLUSERS=1 /qn /liewa $LogApp" $url = "$(Get-CurrentControlUpConsoleURL)" $ProgressPreference = 'SilentlyContinue' Start-Transcript $LogPS if( -Not (Test-Path -Path $Version ) ) { New-Item -ItemType directory -Path $Version | Out-Null } CD $Version Write-Verbose "Downloading $Vendor $Product $Version" -Verbose If (!(Test-Path -Path $Source)) { Invoke-WebRequest -UseBasicParsing -Uri $url -OutFile $Source Expand-Archive -Path "$PackageName.$InstallerType" -DestinationPath . Copy-Item "ControlUpConsole.exe" -Destination 'C:\Program Files\Smart-X' } Else { Write-Verbose "File exists. Skipping Download." -Verbose Copy-Item "ControlUpConsole.exe" -Destination "C:\Program Files\Smart-X" CD.. Copy-Item "ControlUp Console.lnk" -Destination "C:\Users\Public\Desktop" } Write-Verbose "Starting Installation of $Vendor $Product $Version" -Verbose Write-Verbose "Customization" -Verbose Write-Verbose "Stop logging" -Verbose $EndDTM = (Get-Date) Write-Verbose "Elapsed Time: $(($EndDTM-$StartDTM).TotalSeconds) Seconds" -Verbose Write-Verbose "Elapsed Time: $(($EndDTM-$StartDTM).TotalMinutes) Minutes" -Verbose Stop-Transcript |
Start .\ControlUpConsole.exe and log on or create a new Account.
Click Add Machines.

This will automatically install the ControlUp agent on all selected Servers.

Next I’m going to create a Service Account for ControlUp Monitor called svc-controlup with a complex password set to never expires.
This account needs Allow log on Locally. Create a new GPO called Global CC – ControlUp and go to Computer Configuration – Windows Settings – Security Settings – Local Policies – User Rights Assignment. Be aware that you NEED to add Administrators as well.

In the same policy also add the firewall port used by ControlUp.

Head back to ControlUp – Add Monitor.

Add the Service Account credentials and click Shared to be able to reuse.

The rest is straight forward or consult ControlUp documentation for more details. I’m going to install the Monitoring Agent on my MDT server. In Larger Enterprises you would setup multiple dedicated servers for this purpose only.

The last part of this section in building a hybrid cloud is deploying and configuring LAPS. First we need to create a Share where we’ll host the MSI we’re going to deploy through Group Policy. YEAH I’m not a big fan either, but that’s the fastest and easiest way to get this up and running as quick as possible. RDP into your Domain Controller or File Share where you want to host the Share.
|
1 2 |
New-Item -Path "C:\Shares\Software" -Type Directory New-SmbShare -Name "Software$" -Path "C:\Shares\Software" -FullAccess EVERYONE |
Download Local Administrator Password Solution (LAPS) into a sub folder called LAPS\Version on that new share created above.
Create a new Group Policy at Domain Root called Global CC – LAPS and go to Computer Configuration – Policies – Software Settings – Software Installation and right click to Add New Package. Navigate to the MSI using FQDN and select Assigned.

Now reboot all your VMs for the software to be installed. One of the many amazing features of ControlUp is Manage Programs and Updates which allows you to see where LAPS are installed.

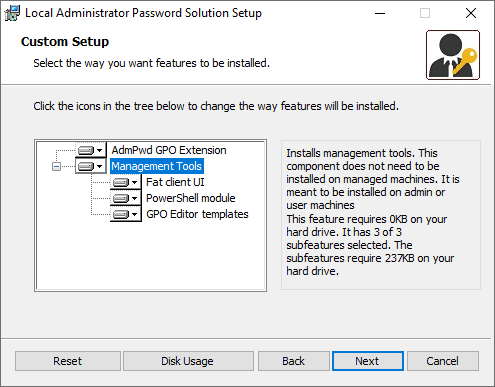
On your Management Server install all the LAPS components.
Last step is to copy the AdmPwd.admx and AdmPwd.adml located in C:\Windows\PolicyDefinitions to your Central Group Policy Store.
Edit the policy Global CC – LAPS and go to Computer Configuration – Policies – Administrative Templates – LAPS

Finally open PowerShell as Administrator and run the following commands to the extend AD Schema. The last line is for which OU you want to enable LAPS.
|
1 2 3 |
Import-module AdmPwd.PS Update-AdmPwdADSchema Set-AdmPwdComputerSelfPermission –Identity "Deployment" |

MAKE SURE YOU HAVE DOMAIN ADMIN ACCOUNT WHICH IS NOT THE DEFAULT ADMINISTRATOR OR YOU WILL LOCK YOUR SELF OUT. HAPPENED TO ME AND TRYING TO RECOVER NOW!!!! OR SIMPLY DO NOT ADD THE GPO AT ROOT LEVEL SO IT DOES NOT APPLY TO DOMAIN CONTROLLERS.
DNS and Citrix Cloud Connector for Your Hybrid Cloud
Configuring DNS correctly, setting up a Group Policy for Authoritive Time Server automation and Citrix Cloud Connector with the Nutanix Plugin.
DNS is critical in any environment and especially so when building our hybrid cloud, so we’re going to cover the basics here. If you want to learn more I HIGHLY recommend Carl Websters Presentations on the topic.
The number one recommendation is to be consistent in how domain controllers have the DNS servers configured. There is not just one way to do DNS configurations for domain controllers. Rule #1 is to pick a standard and be consistent in the application of that standard.
I’m going to set my primary DNS entry to the Domain (PDCe role holder). To find it run the following command.
|
1 |
NetDOM /query FSMO |


Next up is setting DNS Scavenging server for all AD-Integrated Zones, except Trust Anchors. We’re going to use Carl Websters script for this.

You know the saying It’s DNS. It’s always DNS? It normally is, but when it’s not it’s NTP. So again we’re going to use Carl Websters script and post Creating a Group Policy using Microsoft PowerShell to Configure the Authoritative Time Server to fix this.
I would also recommend this post Configuring the time zone and code page with Group Policy.
Next up is setting up Citrix Cloud Connectors. The recommended leading practice are now 3 Cloud Connectors per site.

I’m running the Citrix Cloud Connectors on Windows 2019 Server with 2 vCPU and 3 GB of memory. This is NOT a recommended hardware configuration in Production, but I’m keeping an eye on ControlUp Insigts and real time stats.
To automatically install the Citrix Cloud Connector you can use the code below. Please note that you need to create your API key at Identity and Access Management – API Access.
|
1 2 3 4 5 6 7 8 9 10 11 12 13 14 15 16 17 18 19 20 21 22 23 24 25 26 27 28 29 30 31 32 33 34 35 |
Clear-Host Write-Verbose "Setting Arguments" -Verbose $StartDTM = (Get-Date) $Vendor = "Citrix" $Product = "Cloud Connector" $Version = "6.16.0.31167" $PackageName = "cwcconnector" $InstallerType = "exe" $Source = "$PackageName" + "." + "$InstallerType" $LogPS = "${env:SystemRoot}" + "\Temp\$Vendor $Product $Version PS Wrapper.log" $LogApp = "${env:SystemRoot}" + "\Temp\$PackageName.log" $Destination = "${env:ChocoRepository}" + "\$Vendor\$Product\$Version\$packageName.$installerType" $UnattendedArgs = '/q /Customer:trond /ClientID:XXXX /ClientSecret:XXXX /AcceptTermsOfService:true' $url = "https://downloads.cloud.com/trond/connector/cwcconnector.exe" Start-Transcript $LogPS If (!(Test-Path -Path $Version)) {New-Item -ItemType directory -Path $Version | Out-Null} CD $Version Write-Verbose "Downloading $Vendor $Product $Version" -Verbose If (!(Test-Path -Path $Source)) {Invoke-WebRequest -UseBasicParsing -Uri $url -OutFile $Source} Write-Verbose "Starting Installation of $Vendor $Product $Version" -Verbose (Start-Process "$PackageName.$InstallerType" $UnattendedArgs -Wait -Passthru).ExitCode Write-Verbose "Customization" -Verbose Write-Verbose "Stop logging" -Verbose $EndDTM = (Get-Date) Write-Verbose "Elapsed Time: $(($EndDTM-$StartDTM).TotalSeconds) Seconds" -Verbose Write-Verbose "Elapsed Time: $(($EndDTM-$StartDTM).TotalMinutes) Minutes" -Verbose Stop-Transcript |
Warning! Citrix has stripped down the size of the Cloud Connector and are synchronizing the rest from the Cloud. If you run the Nutanix Plugin setup straight after it will fail. The current workaround is to wait for these Files and Folders to show up before installing the Nutanix Plugin.

If you want to automate make sure to also download my custom MST file. My setup took 20 minutes for the Citrix Cloud Connector to sync up.
|
1 2 3 4 5 6 7 8 9 10 11 12 13 14 15 16 17 18 19 20 21 22 23 24 25 26 27 28 29 30 31 32 33 34 35 36 37 38 |
Clear-Host Write-Verbose "Setting Arguments" -Verbose $StartDTM = (Get-Date) $Vendor = "Nutanix" $Product = "MCS Plugin" $Version = "2.5.0.0" $PackageName = "Nutanix_AHV_Citrix_XenDesktop_combined_installer" $InstallerType = "msi" $Source = "$PackageName" + "." + "$InstallerType" $LogPS = "${env:SystemRoot}" + "\Temp\$Vendor $Product $Version PS Wrapper.log" $LogApp = "${env:SystemRoot}" + "\Temp\$PackageName.log" $MST = "Nutanix.mst" $UnattendedArgs = "/i $PackageName.$InstallerType TRANSFORMS=$MST ALLUSERS=1 /qn /liewa $LogApp" $url = "http://download.nutanix.com/firmware/citrix/2.5.0.0/Nutanix_AHV_Citrix_XenDesktop_combined_installer.msi" Start-Transcript $LogPS If (!(Test-Path -Path $Version)) {New-Item -ItemType directory -Path $Version | Out-Null} CD $Version Write-Verbose "Waiting for Citrix Cloud Connector to Syncronize" -Verbose while (!(Test-Path "C:\Program Files\Common Files\Citrix\HCLPlugins\RegisterPlugins.exe")) { Start-Sleep 10 } Write-Verbose "Downloading $Vendor $Product $Version" -Verbose If (!(Test-Path -Path $Source)) {Invoke-WebRequest -UseBasicParsing -Uri $url -OutFile $Source} Write-Verbose "Starting Installation of $Vendor $Product $Version" -Verbose (Start-Process msiexec.exe -ArgumentList $UnattendedArgs -Wait -Passthru).ExitCode Write-Verbose "Customization" -Verbose Write-Verbose "Stop logging" -Verbose $EndDTM = (Get-Date) Write-Verbose "Elapsed Time: $(($EndDTM-$StartDTM).TotalSeconds) Seconds" -Verbose Write-Verbose "Elapsed Time: $(($EndDTM-$StartDTM).TotalMinutes) Minutes" -Verbose Stop-Transcript |
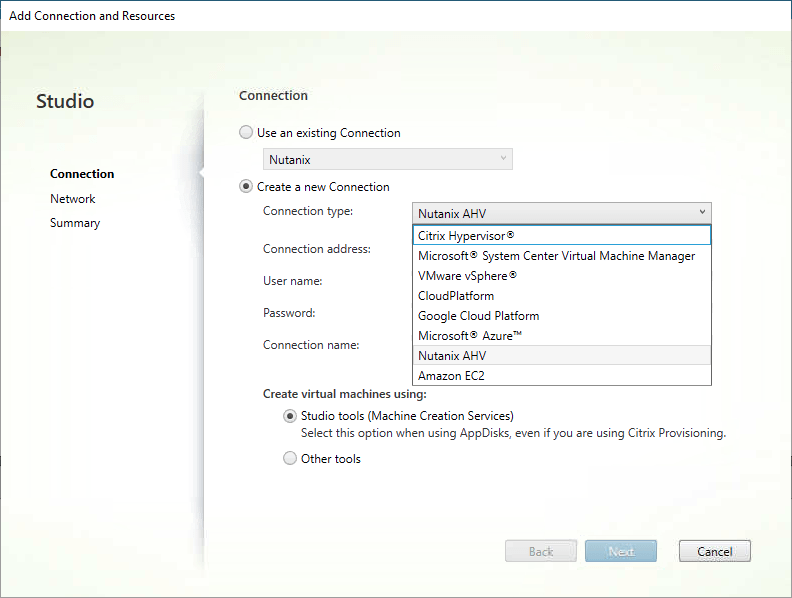
Without the Nutanix Plugin installed on ALL your Citrix Cloud Connectors you won’t see Nutanix AHV in the Connection type list.
Certificates, AD Logon, Windows Admin Center and Admin Portal
Changing the self-sign Nutanix Cluster certificate and enabling Active Directory Log on. We’re also going to setup Windows Admin Center and Admin Portal.
Security should be on anybody’s minds these days and friends don’t let friends use Self Signed Certificates! While wildcard certificates is not the perfect solution, I find them very easy to setup, use and implement. After all they’re a lot more secure than the Out of the Box Self Signed Certificates.
If you used my Automation Framework Community Edition for your Domain Controller setup you automatically got PKI installed, wildcard certificate created and exported to the various file formats. In case you didn’t you can download the scripts from my Github repo (remember to edit the ssl.ini file).
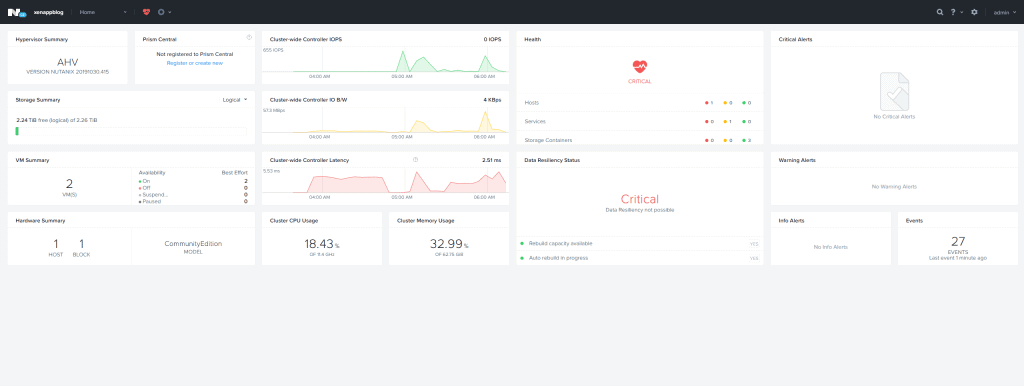
Before we continue I’m going to configure my Nutanix Cluster to use my wildcard certificate and enable Active Directory integration for logon.
Head over to your Nutanix Cluster and click the Gear – SSL Settings – Replace Certificate.

Select Import Key and Certificate.

Browse to the private key and certificate. The internal domain CA certificate chain has to be exported manually though, through MMC – Certificates – Trusted Root Certificate Authority Store.

After you’ve imported the files you have successfully enabled SSL for your Nutanix Cluster.

To test that LDAPS works in your domain start ldp.exe from your Domain Controller. Set the port to 636 and select SSL.
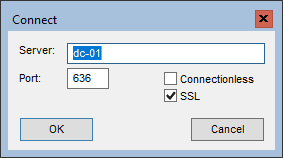
Click OK. The following shows a successful test.

Next up is Active Directory integration. Select Gear – Authentication and fill in your LDAP information. Remember to use LDAPS and use a dedicated Service Account with a strong password set to never expires.

When you click Save you’ll need to Create Role Mapping.

Finally test login with Active Directory.

I also did the same for my VMware Cluster using the instruction in this post How to replace default vCenter VMCA certificate with Microsoft CA signed certificate.
For Windows Admin Center I’m using a Windows 2019 Server Core with 1 vCPU and 1 GB of memory. The first step is to install the wildcard domain certificate.

Then download Windows Admin Center and run the setup. We’re going to use port 443 and our wildcard certificate. You’ll find the thumbprint in the wildcard.txt file.

To enable Single Sign On you need to add the Server to the Local Intranet. You should use Group Policy for this. Go to User Configuration – Policies – Administrative Templates – Windows Components – Internet Explorer – Internet Control Panel – Security Page – Site to Zone Assignment List.

Click Add to add your resources.

When Searching Active Directory you can use a wildcard.


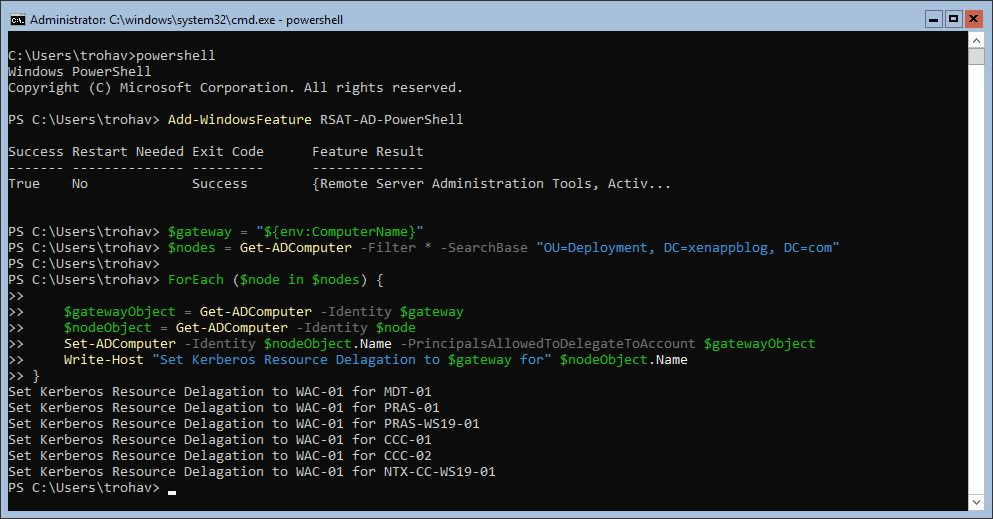
To enable Single Sign On we need to enable Kerberos Constrained Delegation. Run the following Powershell code on the WAC server to automate this. Make sure to edit Line 3 to reflect your Domain.
|
1 2 3 4 5 6 7 8 9 10 11 |
Add-WindowsFeature RSAT-AD-PowerShell $gateway = "${env:ComputerName}" $nodes = Get-ADComputer -Filter * -SearchBase "OU=Deployment, DC=xenappblog, DC=com" ForEach ($node in $nodes) { $gatewayObject = Get-ADComputer -Identity $gateway $nodeObject = Get-ADComputer -Identity $node Set-ADComputer -Identity $nodeObject.Name -PrincipalsAllowedToDelegateToAccount $gatewayObject Write-Host "Set Kerberos Resource Delagation to $gateway for" $nodeObject.Name } |
During the import of the wildcard certificate we also setup a basic IIS server. With port 80 available on the WAC server, this is the perfect place for the Admin Portal, because its just favourites. The code can be downloaded here.

Place the code in C:\inetpub\wwwroot and run the following command.
|
1 |
.\PortalGenerator.ps1 -ConfigFile .\config.csv -WebSiteFile .\index.html |
Make sure to delete Default.htm and iisstart.htm that way you get index.html loaded by default.
Backing up the Cluster Using Nakivo Backup
Setting up a Nakivo backup solution for our Nutanix & VMware Cluster. We now have fully functional infrastructure, so it would be a PITA to lose it all in case anything goes wrong.
Currently, Nakivo does not run Director on AHV, only Transporter. So you’ll need another Hypervisor, NAS (Synology, QNAP, WD, Netgear) or even a Physical Machine to control everything. In this post I’m going to use my VMware Cluster (Director and Repository) to backup my Nutanix Cluster (via Transporter).
Download the Full Solution Nakivo Backup and Replication OVA and deploy it through vCenter. After the VM has been created I’m adding a 2nd disk which is going to be my Backup Repository.

Start the VM and launch the Web Console. Select Manage NAKIVO services – Onboard repository storage. Select the new Storage – Use this disk as backup storage.

Select Network settings to find the DHCP address or manually set a static address. You also might want to change the Time Zone. I’m adding a DNS record so I can start the console through the Admin Portal.
Create an User Account and click Proceed.

Next we’re going to create an Inventory. I’m going to create one for my VMware Cluster and another one for my Nutanix Cluster.

Then I’m going to select Deploy New Transporter to the Nutanix Cluster. The Onboard transporter is the one used by VMware.

Click Add Backup Repository – Create new backup repository.

Click Finish at the bottom of the page.
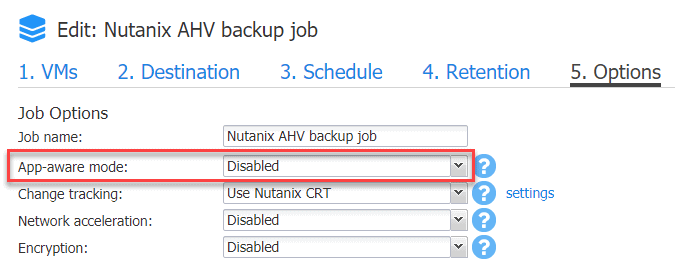
Next click Create – Nutanix AHV backup job. On the Options tab make sure to set App-aware mode to Disabled. That way you don’t need to install the Nutanix Guest Tools on every VM.
The rest is straight forward. At the end click Finish & Run.

If you use my Automation Framework Community Edition to deploy the Domain Controller you already have the wildcard certificates exported to the various format, see also Building Hybrid Cloud on Nutanix CE – Part IV.
Navigate to Configuration – System Settings and scroll to the bottom to select Install new certificate.
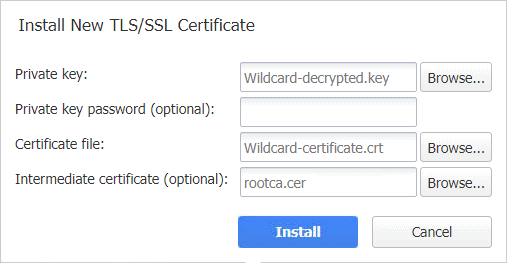
Finally you would want to setup email notifications from Configuration – Email Notifications. The following is the required configuration for Office 365.

Building a Master Image
Building our first Master Image semi automatically using the Automation Framework for Microsoft Deployment Toolkit.
The Automation Framework has been configured according to the training videos inside the paid membership area. If you’re not a member you can use the free Automation Framework Community Edition instead, mostly manually though.

This will automatically kick off the Master Image build and notify through email and webhooks when completed. The process is more or less the same independent of the Hypervisor and EUC vendor.

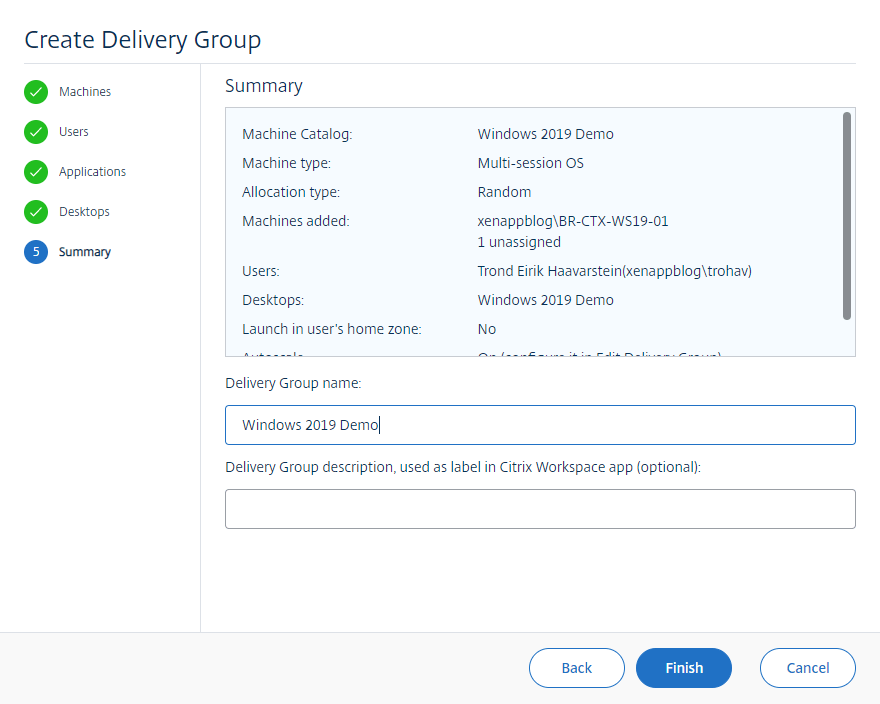
After the Master Image has been deployed and optimized with the Base Image Script Framework (BIS-F) it’s time to manually create a Machine Catalog and Delivery Group in Citrix Cloud. We’re going to use the new Web Studio Console.


After a couple of minutes the Machine Catalog is ready and it’s time to create the Delivery Group.

I highly recommend against using the Library option. Just don’t do it!


That was the manual part. What if we could do the same 100% automated? Even running on a Schedule? We’ll that’s what you get as a paid member.

The script uses encrypted password files to authenticate to the Hypervisor and Citrix Cloud. When the deployment is finished, notifications are sent via Webhooks to Teams and Slack + email defined in the Global xml file.


A Machine Catalog and Delivery Group are also automatically created in the Citrix Cloud with access permissions defined in the Global xml file.

Setting up the Core Infrastructure on Azure
This section contains PowerShell scripts to both Create and Delete your Azure Lab.
Before you start there’s some essential information required to be able to run the build script. First locate the name of the subscription you want to use.

|
1 |
Set-AzContext -Subscription "Microsoft Partner Network" |
Next you need do decide which location you want to setup the Resource Group. See the Azure map above to pick a location close to where you live.
|
1 |
$Location1 = "South Central US" |
Since you’re going to setup a Site 2 Site VPN to Azure you need to specify your Onprem DNS Servers so that we can automatically join VMs in Azure to your Domain.
|
1 2 |
$DNS1 = "192.168.14.10" $DNS2 = "192.168.14.11" |
To be able to setup a Site 2 Site VPN tunnel to Azure, you’ll need to find the external IP address of your Gateway. There are many solutions available, but the only one I recommend is Ubiquiti Unifi Security Gateway (USG) for $131.99.
From the Unifi Dashboard select Devices – USG and expand WAN1. If the IP Address is an internal one, then you’ll need to switch your ISP modem to Bridge Mode. Most modern modems support this, in my case I had to subscribe to a Fixed IP Address plan.

To be able to reach your Onprem networks from Azure, you need to specify those subnets. In my example its the Server Network, VM Network and my Datacenter in Canada. $LNGIP1 is your external IP address.
|
1 2 3 4 5 6 |
$LNG1 = "xenappblog" $LNGprefix1 = "192.168.2.0/24" $LNGprefix2 = "192.168.14.0/24" $LNGprefix3 = "192.168.84.0/24" $LNGIP1 = "189.x.x.x" $Connection1 = "VNETtoBMTC" |
Finally you’ll need to set your Shared Secret Key. That’s the password used on both sides to authenticate and establish the VPN Tunnel.
|
1 |
New-AzVirtualNetworkGatewayConnection -Name $Connection1 -ResourceGroupName $RG1 -Location $Location1 -VirtualNetworkGateway1 $vng1 -LocalNetworkGateway2 $lng1 -ConnectionType IPsec -SharedKey "xxxxxxxx" |
After running the complete script, it will show the public IP address of your VPN Gateway in Azure.

Go to Settings – Networks – Create New Network. The configuration is straight forward. Remote Subnets are the Subnets you want to reach in Azure from your Onprem environment.

|
1 2 3 4 5 6 7 8 9 10 11 12 13 14 15 16 17 18 19 20 21 22 23 24 25 26 27 28 29 30 31 32 33 34 35 36 37 38 39 40 41 42 43 44 45 46 47 48 49 50 51 52 53 54 55 56 57 |
Clear-Host Install-Module -Name Az -AllowClobber Import-Module -Name Az Connect-AzAccount Set-AzContext -Subscription "Microsoft Partner Network" $RG1 = "XENAPPBLOG-PRD-NET" $VNet1 = "XENAPPBLOG-VNET1" $Location1 = "South Central US" $FESubnet1 = "FrontEnd" $BESubnet1 = "Backend" $VNet1Prefix = "10.0.0.0/16" $FEPrefix1 = "10.0.0.0/24" $BEPrefix1 = "10.0.10.0/24" $GwPrefix1 = "10.0.255.0/28" $Gw1 = "XENAPPBLOG-VNET1-GW" $GwIP1 = "XENAPPBLOG-VNET1-GWPIP" $GwIPConf1 = "XENAPPBLOG-VNET1-GWIPCFG" $SecGroup = "XENAPPBLOG-VNET1-NSG" $DNS1 = "192.168.14.10" $DNS2 = "192.168.14.11" Set-Item Env:\SuppressAzurePowerShellBreakingChangeWarnings "true" # Create the Resource Group New-AzResourceGroup -ResourceGroupName $RG1 -Location $Location1 # Create the VNET $fesub1 = New-AzVirtualNetworkSubnetConfig -Name $FESubnet1 -AddressPrefix $FEPrefix1 $besub1 = New-AzVirtualNetworkSubnetConfig -Name $BESubnet1 -AddressPrefix $BEPrefix1 $gwsub1 = New-AzVirtualNetworkSubnetConfig -Name GatewaySubnet -AddressPrefix $GwPrefix1 $vnet = New-AzVirtualNetwork -Name $VNet1 -ResourceGroupName $RG1 -Location $Location1 -AddressPrefix $VNet1Prefix -Subnet $fesub1,$besub1,$gwsub1 -DnsServer $DNS1,$DNS2 # Provision the Gateway $gwpip = New-AzPublicIpAddress -Name $GwIP1 -ResourceGroupName $RG1 -Location $Location1 -AllocationMethod Dynamic $subnet = Get-AzVirtualNetworkSubnetConfig -Name ‘GatewaySubnet’ -VirtualNetwork $vnet $gwipconf = New-AzVirtualNetworkGatewayIpConfig -Name $GwIPConf1 -Subnet $subnet -PublicIpAddress $gwpip New-AzVirtualNetworkGateway -Name $Gw1 -ResourceGroupName $RG1 -Location $Location1 -IpConfigurations $gwipconf -GatewayType Vpn -VpnType RouteBased -GatewaySku Basic # Create Local Network Gateway $LNG1 = "xenappblog" $LNGprefix1 = "192.168.2.0/24" $LNGprefix2 = "192.168.14.0/24" $LNGprefix3 = "192.168.84.0/24" $LNGIP1 = "189.x.x.x" $Connection1 = "VNETtoBMTC" New-AzLocalNetworkGateway -Name $LNG1 -ResourceGroupName $RG1 -Location $Location1 -GatewayIpAddress $LNGIP1 -AddressPrefix $LNGprefix1,$LNGprefix2,$LNGprefix3 # Create the Connection between the Gateway and the Local Gateway $vng1 = Get-AzVirtualNetworkGateway -Name $GW1 -ResourceGroupName $RG1 $lng1 = Get-AzLocalNetworkGateway -Name $LNG1 -ResourceGroupName $RG1 New-AzVirtualNetworkGatewayConnection -Name $Connection1 -ResourceGroupName $RG1 -Location $Location1 -VirtualNetworkGateway1 $vng1 -LocalNetworkGateway2 $lng1 -ConnectionType IPsec -SharedKey "XXXXXXXX" # Create Storage Account New-AzResourceGroupDeployment -ResourceGroupName $RG1 -TemplateUri "https://raw.githubusercontent.com/Azure/azure-quickstart-templates/master/101-storage-account-create/azuredeploy.json" # Create Network Security Group $NSG = New-AzNetworkSecurityGroup -Name $SecGroup -ResourceGroupName $RG1 -Location $Location1 # Assign Network Security Group to vNET $vnet = Get-AzVirtualNetwork -ResourceGroupName $RG1 -Name $VNet1 Set-AzVirtualNetworkSubnetConfig -VirtualNetwork $VNet -Name $BESubnet1 -AddressPrefix $BEPrefix1 -NetworkSecurityGroup $NSG Set-AzVirtualNetwork -VirtualNetwork $vnet # Get Public IP Resource $PublicIP = Get-AzPublicIpAddress $PublicIP = $PublicIP.IpAddress Write-Verbose "Please change to $PublicIP on the Ubiquiti Azure Site 2 Site VPN under Settings - Networks" -Verbose |
That’s it! This should get you up and running pretty fast. You might need to run it a couple of times to get it perfect. To completely delete a Resource Group you can run the following command:
|
1 2 |
$RG1 = "XENAPPBLOG-PRD-NET" Remove-AzResourceGroup -Name $RG1 -Verbose -Force |
Setting up Active Directory in Azure for the Hybrid Cloud
Reduce the latency caused by sending authentication requests from the Cloud back to AD DS running on-premises.

I recommend starting small to keep the cost as low as possible. I’ve had great success running a Standard_B1ms with 1 vCPU and 2 GB of memory with a Standard HHD. Thanks to feedback from Daniel Viklund I’ve modified the script to use a 32GB disk instead 127GB, why pay for more?

Below is generic PowerShell script that will automatically build and join a VM to your Active Directory Domain.
- Line 36-37 = Local Administrator password.
- Line 42-44 = Domain to Join, OU and Join User account.
- Line 48 = Password for the Join User account.
- Line 53 = DNS Servers
|
1 2 3 4 5 6 7 8 9 10 11 12 13 14 15 16 17 18 19 20 21 22 23 24 25 26 27 28 29 30 31 32 33 34 35 36 37 38 39 40 41 42 43 44 45 46 47 48 49 50 51 52 53 54 55 56 57 58 59 60 61 62 63 64 65 |
Clear-Host Install-Module AZ -Force | Import-Module AZ Connect-AzAccount # Variables $VMName = Read-Host -Prompt "VM Name" $ResourceGroupName = "XENAPPBLOG-PRD-NET" $Location = "East US" $VMSize = "Standard_B1ms" # 1 vCPU 2 GB # Domain Controllers #$VMSize = "Standard_B2s" # 2 vCPU 4 GB # Citrix Cloud Connectors #$VMSize = "Standard_D1_v2" # 1vCPU 3.5GB #$VMSize = "Standard_D2_v2" # 2vCPU 7GB # Citrix Worker Gen 2 Support #$VMSize = "Standard_D2s_v3" # 2vCPU 8GB # Citrix PVS in Azure Gen 2 Support #$VMSize = "Standard_DS3_v2" # 4vCPU 14GB # Ephemeral OS Disk Support $PublisherName = "MicrosoftWindowsServer" $Offer = "WindowsServer" $Skus = "2019-datacenter-smalldisk-g2" # "2019-datacenter-gensecond" # "2019-Datacenter" $Version = "latest" Set-AzContext -Subscription "Microsoft Partner Network" $VnetName = "XENAPPBLOG-VNET1" $VnetResourceGroup = "$ResourceGroupName" $SubnetName = "Backend" $Vnet = Get-AzVirtualNetwork -ResourceGroupName $VnetResourceGroup -Name $VnetName $subnet = (Get-AzVirtualNetworkSubnetConfig -Name $SubnetName -VirtualNetwork $Vnet).Id $InterfaceName = $VMName + "-nic" $osDiskName = $VMName + "-OSDisk" $osDiskSize = "32" # "127" $osDiskType = "Standard_LRS" # "Premium_LRS" # Define a credential object to store the username and password for the VM $UserName='xxxxxxxx' $Password='xxxxxxxx'| ConvertTo-SecureString -Force -AsPlainText $Cred=New-Object PSCredential($UserName,$Password) # Domain Join Strings $string1 = '{ "Name": "xenappblog.com", "User": "xenappblog\\xxxxxxxx", "OUPath": "OU=Staging,DC=xenappblog,DC=com", "Restart": "true", "Options": "3" }' $string2 = '{ "Password": "xxxxxxxx" }' # Network $Interface = New-AzNetworkInterface -Name $InterfaceName ` -ResourceGroupName $ResourceGroupName -Location $Location ` -SubnetId $subnet -DnsServer "192.168.14.10", "192.168.14.11" # Create a virtual machine configuration $VMConfig = New-AzVMConfig -VMName $VMName -VMSize $VMSize | ` Set-AzVMOperatingSystem -Windows -ComputerName $VMName -Credential $Cred -ProvisionVMAgent -EnableAutoUpdate | ` Set-AzVMSourceImage -PublisherName $PublisherName -Offer $Offer -Skus $Skus -Version $Version | ` Set-AzVMOSDisk -Name $osDiskName -DiskSizeInGB $osDiskSize -StorageAccountType $osDiskType -CreateOption fromImage | ` Add-AzVMNetworkInterface -Id $Interface.Id # Create VM New-AzVM -ResourceGroupName $ResourceGroupName -Location $Location -VM $VMConfig -DisableBginfoExtension # Joining AD Domain Set-AzVMExtension -ResourceGroupName $ResourceGroupName ` -Name "JoinDomain" ` -VMName $VMName ` -Location $Location ` -Publisher Microsoft.Compute ` -ExtensionType JsonADDomainExtension ` -TypeHandlerVersion 1.0 ` -SettingString $string1 ` -ProtectedSettingString $string2 Get-AzNetworkInterface -ResourceGroupName $ResourceGroupName -Name $InterfaceName | ForEach { $Interface = $_.Name; $IPs = $_ | Get-AzNetworkInterfaceIpConfig | Select PrivateIPAddress; Write-Verbose "$VMName created successfully with IP Address $($IPs.PrivateIPAddress)" -Verbose } |
When the deployment is finished the PowerShell script will display the IP address which you need to connect using RDP. Make sure you have setup a GPO prior that allow for RDP, if not you’ll probably be unable to connect.
I’m not going to cover how to install and configure Active Directory through Add Roles and Features, the process is the same as on-premises. However I’m going to give you some tips on how to configure after the Domain Controller has rebooted.
Open Active Directory Sites and Services and create all the IP subnets for you network infrastructure. This will prevent e.g. WVD trying to authenticate against my Domain Controller to Brasil.
Rule of thumb, if you don’t configure ALL your subnets, you have NO CONTROL and slow logons will be guaranteed.

I’ve always learned that you shouldn’t mess with the NTDS Settings and let Active Directory handle those automatically. Unfortunately that’s not the case! You need to manually add connections to the Domain Controllers you need. E.g. in my example only a connection to Canada was created automatically. Well if that site link goes down, there’s no longer a sync between Azure and my Brasil site.

I’ve configured my Active Directory to replicate changes instantly. This is very important in my environment. Read how to configure it here. Finally you’ll need to put the IP Address of your Azure Domain Controller on the top of your DNS Server list.

That’s pretty much it for configuring Active Directory in Azure. Below is the command to check replication status.
|
1 |
Repadmin /replsummary |

Using Azure Image Builder to Build a Win 10 Enterprise Multi-Session Master Image
This section is based upon the amazing work of Jim Moyle. Make sure to subscribe to his YouTube Channel before you continue!

These posts on Windows Virtual Desktop (WVD) would never have seen the light if it wasn’t for Jim Moyle. I’ll reference to his Github for the code I’m using below.
First, as explain in Episode 2 you’ll need to configure and run the script Once Only Setup.ps1. I’ve changed the following parameters to reflect my location (Available for preview in these regions) and naming standard. Learn how to automatically setup an Azure Lab here.
|
1 2 3 4 |
$location = 'EastUS' $imageResourceGroup = 'XENAPPBLOG-IMAGE-BUILDER' $identityName = "XBIdentity" + $randomNum $myGalleryName = 'XENAPPBLOGGALLERYAIB' |
The rest of Episode 2 and 3 are optional, but highly recommended. What you REALLY want is covered in Episode 4. In that episode you’ll learn how to also install applications during the Azure Image Builder process. At the end of the day, what’s an OS without applications!
You’ll need to edit DeployTemplate.ps1 to include your custom parameters from above + $identityName which you’ll find inside the Resource Group.

Next you’ll need to edit template.json, and search / replace westeurope with your preferred location. When I realized I could simple add any raw code from my Github repo, my head was totally blown away!
Below you can see that I’ve added mRemoteNG, uberAgent, AppVentix and also using my own Windows Update script. Jim mentioned in the video that he had had mixed results with his update code, but mine have never failed.

And that’s it. Kick it off and it will use Azure Image Builder to automatically build and optimize a shiny new Master Image. In the next update to this post on building your Hybrid Cloud, we’ll automatically configure a complete WVD solution using this image and leverage Azure Ephemeral Disk. Stay tuned.