
Windows 2016 Server Core is a great choice for hosting your Windows Server Update Services (WSUS). In this post I’m going to show you how to install, configure and decline superseded updates which will save you losts of time and disk space.

First of all you’ll need to install Windows 2016 Core and configure it’s host name, IP address, join domain, time zone etc using sconfig.exe. I’ve automated all this in my Automation Framework and the following PowerShell script is used in a Task Sequence to automatically install and configure WSUS.
|
1 2 3 4 5 6 7 8 9 10 11 12 13 14 15 16 17 18 19 20 21 22 23 24 25 26 27 28 29 30 31 32 33 34 35 36 37 38 39 40 41 42 43 44 45 46 47 48 49 50 51 52 53 54 55 56 57 58 59 60 61 62 63 64 65 66 67 68 69 70 71 |
Install-WindowsFeature -Name UpdateServices -IncludeManagementTools New-Item -Path C: -Name WSUS -ItemType Directory CD "C:\Program Files\Update Services\Tools" .\wsusutil.exe postinstall CONTENT_DIR=C:\WSUS Write-Verbose "Get WSUS Server Object" -Verbose $wsus = Get-WSUSServer Write-Verbose "Connect to WSUS server configuration" -Verbose $wsusConfig = $wsus.GetConfiguration() Write-Verbose "Set to download updates from Microsoft Updates" -Verbose Set-WsusServerSynchronization -SyncFromMU Write-Verbose "Set Update Languages to English and save configuration settings" -Verbose $wsusConfig.AllUpdateLanguagesEnabled = $false $wsusConfig.SetEnabledUpdateLanguages("en") $wsusConfig.Save() Write-Verbose "Get WSUS Subscription and perform initial synchronization to get latest categories" -Verbose $subscription = $wsus.GetSubscription() $subscription.StartSynchronizationForCategoryOnly() While ($subscription.GetSynchronizationStatus() -ne 'NotProcessing') { Write-Host "." -NoNewline Start-Sleep -Seconds 5 } Write-Verbose "Sync is Done" -Verbose Write-Verbose "Disable Products" -Verbose Get-WsusServer | Get-WsusProduct | Where-Object -FilterScript { $_.product.title -match "Office" } | Set-WsusProduct -Disable Get-WsusServer | Get-WsusProduct | Where-Object -FilterScript { $_.product.title -match "Windows" } | Set-WsusProduct -Disable Write-Verbose "Enable Products" -Verbose Get-WsusServer | Get-WsusProduct | Where-Object -FilterScript { $_.product.title -match "Windows Server 2016" } | Set-WsusProduct Write-Verbose "Disable Language Packs" -Verbose Get-WsusServer | Get-WsusProduct | Where-Object -FilterScript { $_.product.title -match "Language Packs" } | Set-WsusProduct -Disable Write-Verbose "Configure the Classifications" -Verbose Get-WsusClassification | Where-Object { $_.Classification.Title -in ( 'Critical Updates', 'Definition Updates', 'Feature Packs', 'Security Updates', 'Service Packs', 'Update Rollups', 'Updates') } | Set-WsusClassification Write-Verbose "Configure Synchronizations" -Verbose $subscription.SynchronizeAutomatically=$true Write-Verbose "Set synchronization scheduled for midnight each night" -Verbose $subscription.SynchronizeAutomaticallyTimeOfDay= (New-TimeSpan -Hours 0) $subscription.NumberOfSynchronizationsPerDay=1 $subscription.Save() Write-Verbose "Kick Off Synchronization" -Verbose $subscription.StartSynchronization() Write-Verbose "Monitor Progress of Synchronisation" -Verbose Start-Sleep -Seconds 60 # Wait for sync to start before monitoring while ($subscription.GetSynchronizationProgress().ProcessedItems -ne $subscription.GetSynchronizationProgress().TotalItems) { #$subscription.GetSynchronizationProgress().ProcessedItems * 100/($subscription.GetSynchronizationProgress().TotalItems) Start-Sleep -Seconds 5 } |
This is how it looks if you run it manually:

The PowerShell script will install and configure WSUS for Windows Server 2016 only and all of it’s classifications. It will also start the initial synchronization with Microsoft to download new Products so be aware that this will take some time depending on you internet connection.
Open PowerShell ISE and run the following command to start an remote session:
|
1 |
Enter-PSSession -ComputerName WSUS-Core |
Now copy the content below into the script editor and run the script. As you can see below 44 Updates where declined.
|
1 2 3 4 5 6 7 8 9 10 11 12 13 14 15 16 17 18 19 20 21 22 23 24 25 26 27 28 29 30 31 32 33 34 35 36 37 38 39 40 41 42 43 44 45 46 47 48 49 50 51 52 53 54 55 56 57 58 59 60 |
#Change server name and port number and $True if it is on SSL $Computer = $env:COMPUTERNAME [String]$updateServer1 = $Computer [Boolean]$useSecureConnection = $False [Int32]$portNumber = 8530 # Load .NET assembly [void][reflection.assembly]::LoadWithPartialName("Microsoft.UpdateServices.Administration") $count = 0 # Connect to WSUS Server $updateServer = [Microsoft.UpdateServices.Administration.AdminProxy]::getUpdateServer($updateServer1,$useSecureConnection,$portNumber) write-host "<<<Connected sucessfully >>>" -foregroundcolor "yellow" $updatescope = New-Object Microsoft.UpdateServices.Administration.UpdateScope $u=$updateServer.GetUpdates($updatescope ) foreach ($u1 in $u ) { if ($u1.IsSuperseded -eq 'True') { write-host Decline Update : $u1.Title $u1.Decline() $count=$count + 1 } } write-host Total Declined Updates: $count trap { write-host "Error Occurred" write-host "Exception Message: " write-host $_.Exception.Message write-host $_.Exception.StackTrace exit } # EOF |
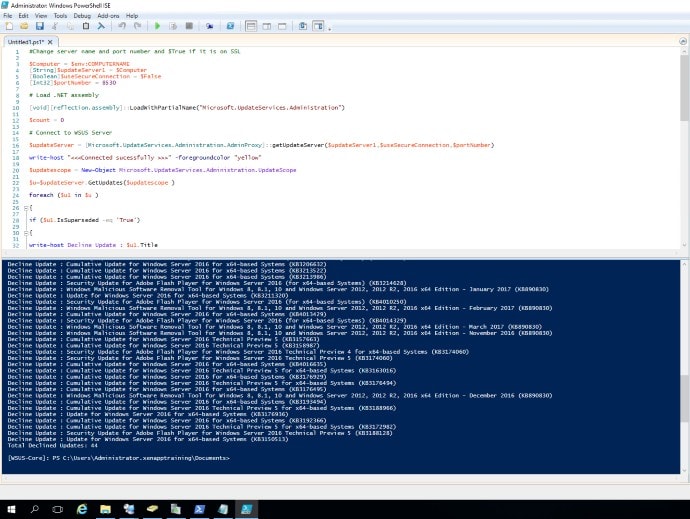
By running the above script you basically tell WSUS that you don’t want to download 44 updates that has already been declined. If you go the normal route you would waste valuable disk space, time and killing your internet connection.
As a part of this blog post research I did enable Windows 2008 R2, Windows 2012 R2 and Windows 2016. The script where able to go from 2132 unapproved updates to 884 unapproved updates taking up only 8 GB of disk space.
So now that you’ve declined all those unnecessary updates it’s time to connect to your WSUS server running on Server Core. Install the WSUS Console on your Management Server using the following script.
|
1 |
Install-WindowsFeature -Name UpdateServices-Ui |

There’s currently a bug (been there for a long time) so even though WSUS was configured unattended, it will still bring up the Welcome Wizard. Just click through it or Cancel.
The final step is to head over to Options – Automatic Approvals and Enable & Run the Rule.

This will start the download process of all approved updates. Enjoy!

Hi! Colleage has passed me this article, very good contribution! I also tried to play a little bit with automating WSUS – script for running WSUS update firstly on pilot group, and later on all others can be found here https://paweljarosz.wordpress.com/2016/12/24/powershell-script-to-auto-approve-wsus-updates-for-pilot-and-standard-groups/ 😛
Thanks for sharing Pawel, will take a look at it.
Do you think we could install a WSUS server on Nano server?
Nano is dead, so go with Core.
Really appreciate you posting this script, its a real insight. Thank you.
Only a small suggestion but I amended the progress comment for the second sync, I think in the example above its commented out, I just prefixed the line with number format
“{0:N0}%” -f $($subscription.GetSynchronizationProgress().ProcessedItems * 100/($subscription.GetSynchronizationProgress().TotalItems))
Thanks again
Thanks Gary
Cant get the output to work with this either. Whats the correct line to view the % progress?
Cant this to work either. Whats the correct line to view the % progress?
Windows Defender error code 0X800704EC popped up while using it on the system. It may be due to run two anti-viruses simultaneously on the Windows PC. If you are also facing such issue visit Windows Defender error code 0X800704EC for the help.
hello;
thanks for the post.
I’ve tried it out – but with the first script the WSUS SVR hasn’t synced anything (was almost 8hours and still on 0% of the first sync)
Are you using Proxy?
Hello Trond,
No I’m not using a proxy.
Also I’ve another WSUS server in the environment and it sync without problem (at the moment NO GPO is set to point to this WSUS SVR – so it cannot be the problem).