
![]()
Many people are wondering what´s the best way to get started learning Citrix or play with new products if you don´t have your own hardware.
In this blog post I´m going to show you how I’m Running a Citrix lab in Amazon AWS. This post will show you how to build a complete Citrix XenApp / XenDesktop 7.6 solution in Amazon AWS. So let´s get started.
In this lab we´re going to run 3 instances :
- DC-01 > AD / DNS / Infrastructure
- XADC-01 > Delivery Controller / StoreFront / SQL Express / Director
- WS12-01 > Windows Server OS for publishing Apps and Desktops
Go to the EC2 Dashboard and click launch instance. We´re going to use Windows 2012 R2 Base with the t2.micro which are free of use for the first 750 hours. Make sure to create a private key and store it in a secure location for later usage.

To connect to the EC2 instances from my Mac or Windows machines I´m using Remote Desktop Manager which can automatically sync all the connections to the cloud so they´re available everywhere.

Now that we are connected to our first instance which is going to be our Domain Controller (DC-01) we´re going to use Powershell to do all the configurations for us. Thanks to fellow CTP Carl Webster for his blog post Installing Domain Controller Using Powershell. Run Powershell as an Administrator and paste in the following commands:
|
1 2 3 4 5 6 7 |
Set-ExecutionPolicy bypass Add-WindowsFeature "RSAT-AD-Tools" Add-WindowsFeature -Name "ad-domain-services" -IncludeAllSubFeature -IncludeManagementTools Add-WindowsFeature -Name "dns" -IncludeAllSubFeature -IncludeManagementTools Add-WindowsFeature -Name "gpmc" -IncludeAllSubFeature -IncludeManagementTools Add-WindowsFeature -Name "rds-licensing" Add-WindowsFeature -Name "rds-licensing-ui" |

Then configure the domain (ctxlab.local) with the following commands:
|
1 2 3 4 5 6 7 8 9 10 11 12 |
Install-ADDSForest ` -CreateDnsDelegation:$false ` -DatabasePath "C:\Windows\NTDS" ` -DomainMode "Win2012R2" ` -DomainName “ctxlab.local" ` -DomainNetbiosName "ctxlab" ` -ForestMode "Win2012R2" ` -InstallDns:$true ` -LogPath "C:\Windows\NTDS" ` -NoRebootOnCompletion:$false ` -SysvolPath "C:\Windows\SYSVOL" ` -Force:$true |

The server will automatically reboot so log in again to configure DNS. Paste in the following lines one by one:
|
1 2 3 4 5 |
Set-DnsServerPrimaryZone –Name "ctxlab.local" –ReplicationScope "Forest" Set-DnsServerScavenging –ScavengingState $True –RefreshInterval 7:00:00:00 –NoRefreshInterval 7:00:00:00 –ScavengingInterval 7:00:00:00 –ApplyOnAllZones –Verbose Set-DnsServerZoneAging ctxlab.local –Aging $True –NoRefreshInterval 7:00:00:00 –RefreshInterval 7:00:00:00 –ScavengeServers 172.30.0.136 –PassThru –Verbose Add-DnsServerPrimaryZone –ReplicationScope "Forest" –NetworkId "172.30.0.0/24" –DynamicUpdate Secure –PassThru –Verbose Set-DnsServerZoneAging "0.30.172.in-addr.arpa" –Aging $True –NoRefreshInterval 7:00:00:00 –RefreshInterval 7:00:00:00 –PassThru –Verbose |

Now change the DNS settings on IPv4 to point to your Domain Controllers internal IP-address, change the server name, disable IE security etc and reboot the server.

When you’re Running a Citrix lab in Amazon AWS you need to allow traffic to flow between the Virtual Machines. Out of the box internal communication is very restricted so we need to head over to Network & Security – Security Groups – Create Security Group. Since this is a dummy lab I´m going to allow all traffic and also disable the Windows Firewall.
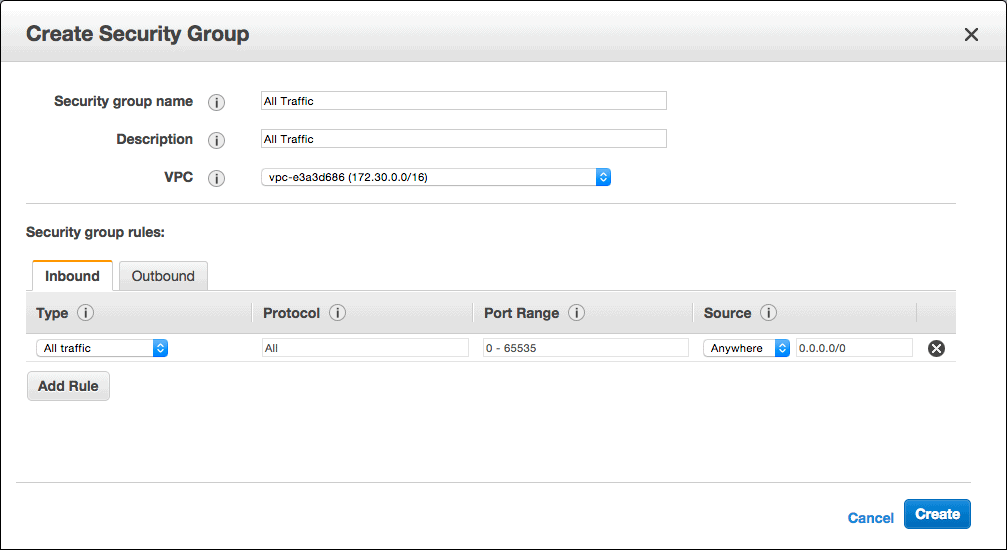
Now add this Security Group to your VM´s and also to remember to do the same for all new instances.


Now let´s create a second instance which is going to host all the Citrix XenApp Infrastructure like Delivery Controller, Licensing Server, SQL Express and Storefront (XADC-01). Use t2.small with 2GB of memory and change the storage from 30 to 100Gb or whatever.
Connect to your new instance and download the Citrix XenApp / XenDesktop 7.6 ISO image. To make the installation as fast and easy as possible we´re going to use an unattended installation. Copy the following lines below and save it as an batch file in the root of the folder you copied the content of the ISO file. In my example I’m using C:\Citrix XenDesktop 7.6
Note: If you´re going to install XenDesktop instead of XenApp just drop the /XenApp line in the script.
|
1 2 3 4 5 6 7 8 9 10 11 12 13 14 15 16 17 |
@ECHO OFF REM Set variables SET SOURCE=%~dp0 SET SOURCE=%SOURCE:~0,-1% IF NOT DEFINED LOGDIR SET LOGDIR=%SystemRoot%\TEMP SET OPTIONS= SET OPTIONS=/QUIET SET OPTIONS=%OPTIONS% /NOREBOOT SET OPTIONS=%OPTIONS% /XENAPP SET OPTIONS=%OPTIONS% /CONFIGURE_FIREWALL SET OPTIONS=%OPTIONS% /LOGPATH %LOGDIR% IF "%PROCESSOR_ARCHITECTURE%"=="AMD64" PUSHD "x64\XenDesktop Setup" IF "%PROCESSOR_ARCHITECTURE%"=="x86" PUSHD "x86\XenDesktop Setup" START /WAIT XenDesktopServerSetup.exe %OPTIONS% |
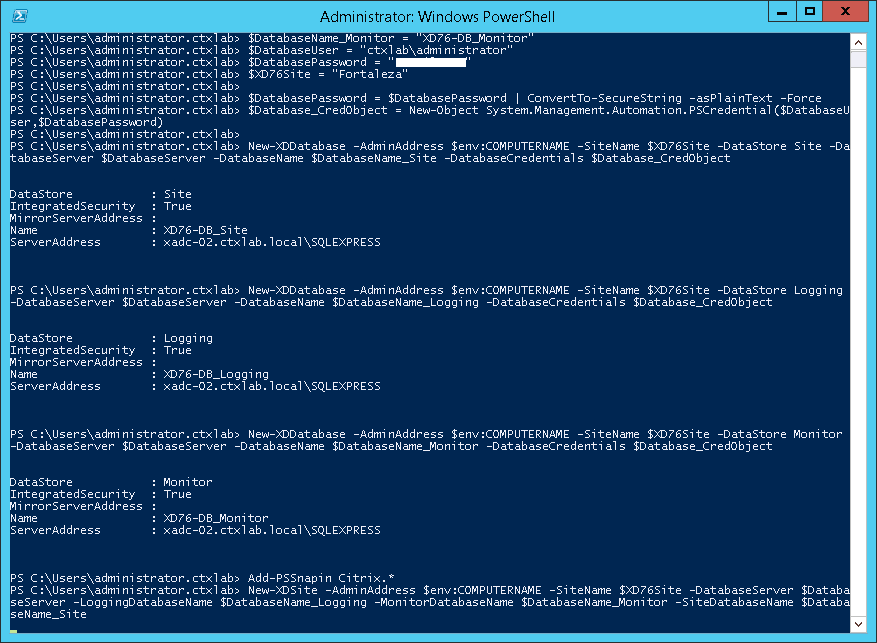
Run the batch script above to install Citrix XenApp / XenDesktop completely unattended. When the installation is finished it´s time to configure the Site with the following commands:
|
1 2 3 4 5 6 7 8 9 10 11 12 13 14 15 16 17 18 19 20 21 22 23 24 25 26 27 28 29 30 31 32 33 34 35 36 37 38 |
$DatabaseServer = $env:COMPUTERNAME + "\SQLEXPRESS" $DatabaseName_Site = "XD76-DB_Site" $DatabaseName_Logging = "XD76-DB_Logging" $DatabaseName_Monitor = "XD76-DB_Monitor" $DatabaseUser = "ctxlab\administrator" $DatabasePassword = "********" $XD76Site = "Fortaleza" $FullAdminGroup = "ctxlab\Administrators" $LicenseServer = $env:COMPUTERNAME $LicenseServer_LicensingModel = "UserDevice" $LicenseServer_ProductCode = "XDT" $LicenseServer_ProductEdition = "PLT" $LicenseServer_Port = "27000" $LicenseServer_ProductVersion = "7.6" $LicenseServer_AddressType = "WSL" $DatabasePassword = $DatabasePassword | ConvertTo-SecureString -asPlainText -Force $Database_CredObject = New-Object System.Management.Automation.PSCredential($DatabaseUser,$DatabasePassword) Set-Service SQLBrowser -startuptype "Automatic" Start-Service SQLBrowser netsh advfirewall firewall add rule name = SQLPortTCP dir = in protocol = tcp action = allow localport = 1433 remoteip = localsubnet profile = DOMAIN netsh advfirewall firewall add rule name = SQLPortTCP dir = in protocol = tcp action = allow localport = 1434 remoteip = localsubnet profile = DOMAIN netsh advfirewall firewall add rule name = SQLPortUDP dir = in protocol = udp action = allow localport = 1434 remoteip = localsubnet profile = DOMAIN Add-PSSnapin Citrix.* New-XDDatabase -AdminAddress $env:COMPUTERNAME -SiteName $XD76Site -DataStore Site -DatabaseServer $DatabaseServer -DatabaseName $DatabaseName_Site -DatabaseCredentials $Database_CredObject New-XDDatabase -AdminAddress $env:COMPUTERNAME -SiteName $XD76Site -DataStore Logging -DatabaseServer $DatabaseServer -DatabaseName $DatabaseName_Logging -DatabaseCredentials $Database_CredObject New-XDDatabase -AdminAddress $env:COMPUTERNAME -SiteName $XD76Site -DataStore Monitor -DatabaseServer $DatabaseServer -DatabaseName $DatabaseName_Monitor -DatabaseCredentials $Database_CredObject New-XDSite -AdminAddress $env:COMPUTERNAME -SiteName $XD76Site -DatabaseServer $DatabaseServer -LoggingDatabaseName $DatabaseName_Logging -MonitorDatabaseName $DatabaseName_Monitor -SiteDatabaseName $DatabaseName_Site Set-ConfigSite -AdminAddress $env:COMPUTERNAME -LicenseServerName $LicenseServer -LicenseServerPort $LicenseServer_Port -LicensingModel $LicenseServer_LicensingModel -ProductCode $LicenseServer_ProductCode -ProductEdition $LicenseServer_ProductEdition -ProductVersion $LicenseServer_ProductVersion $LicenseServer_AdminAddress = Get-LicLocation -AddressType $LicenseServer_AddressType -LicenseServerAddress $LicenseServer -LicenseServerPort $LicenseServer_Port $LicenseServer_CertificateHash = $(Get-LicCertificate -AdminAddress $LicenseServer_AdminAddress).CertHash Set-ConfigSiteMetadata -AdminAddress $env:COMPUTERNAME -Name "CertificateHash" -Value $LicenseServer_CertificateHash |

Finally it´s time to create the third instance where we will install software and the Citrix VDA agent and later add it to the machine catalog in Citrix Studio.


Now let´s create a Machine Catalog.


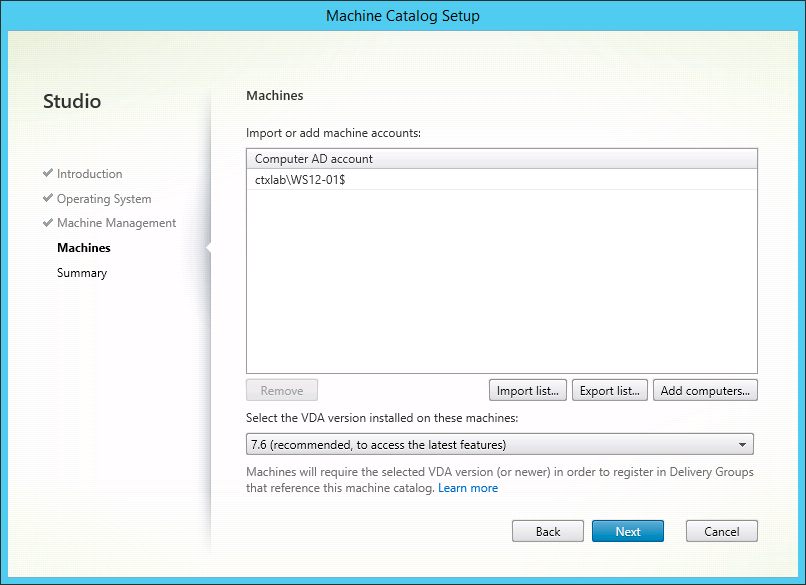

Make sure that the machine(s) shows as Registered.

Finally let´s publish a Desktop and some Applications.


To make the login progress easier for our users we´re going to add the domain. Head into Citrix Storefront – Authentication – Trusted Domains.

Access your StoreFront from http://AWSExternalIP/Citrix/StoreWeb
Please be aware that you won´t be able to launch any applications at this time. You´ll get an error message like this.

To be able to access the published applications and desktops in Amazon AWS you need to configure a Netscaler Gateway, and that my friend is another blog post coming soon.
That’s how I am Running a Citrix lab in Amazon AWS almost free of charge.
Resources
I found this to be very interesting, some of the AWS steps was more of a learning as you go since you did not go into great detail but any IT admin should be able to figure it out.
Big changes from XA6.5 to 7.6. Looking fwd to the Netscaler config to bring it all home, I gave it a shot but the AWS piece is tricky.
Thanks for the comment Chris, yeah I skipped the AWS stuff, the blog would have been very long if I included that. The Netscaler blog post should be ready next week.
Any update on the netscaler guide?
Any update on the netscaler guide?
I am all setup just cant access it from outside AWS.
Can you publish what you have?
It´s really hard, since I´m not a networking guy. Will send you what I have so far.
Thank you Eric! A very useful guide to get the basic DC and DDC setup on AWS.
I have been meaning to move my home lab over to AWS but was conscious of finding out what are the approximate cost/day of running your lab in AWS.
Looking forward to your Netscaler-in-AWS guide.
Thanks Mayur. I don’t have any cost figures for you since I’m using many other services from AWS. But be aware that you can shutdown the machines when not in use and as a new customer you also get 750 free hours. The Netscaler guide should be ready next week.
Any ETA on when you might be able to share the Netscaler guide.
No ETA, the setup was a bit more complicated than I thought, but it’s coming 🙂
Hello, is the Netscaler lab on AWS guide completed? I would very much like to try this out!
thanks for all the great work so far!
It’s way to complex for me to offer time at this topic at the moment. Sometimes in the future though.
Ok, no worries. But it can be done in AWS, correct? Such that a complete ctx lab with netscaler is possible to exist in AWS? Do you have a “basic” scaled down procedure that just lists the main steps without all the details?
Yes it is support, think I will just break it into 2 part series, since the first part is ready. Just have not had time to spin up more VM in that dedicated subnet. Should go out later this or next week then. Thanks
Hey Eric,
Very good article.I need to know one thing is that hypersior setting is also in batch file or not?
Actually I want to use and test Xendesktop 7.6 AWS as hypervisor features.
Appreciate your response.
Addy
No Hypervisor configuration needed.
please shall i pay to do that or can i do it for free ?
There are 750 free hours when you sign up for Amazon, but guess you need to provide Credit Card information. Please check their site for information.
NetScaler Info:
Hello all,
There are some really good documents on how to setup a free NetScaler VPX1000 w/ free license. See URL below. You will need a Citrix account (Most of you will have one already). The NetScaler configuration can be VERY difficult, but you can keep it simple by only configuring Remote Access Gateway, SSL and Load balancing StoreFront (optional). You will need to build an Internal Root Certificate authority (Can be on your existing Domain controller). GOOD LUCK! 🙂
Depending on your firmware there are allot of documents on setting up Remote Access Gateway & SSL…
————————
DOWNLOAD the free Netscaler Virtual appliance, firmware updates and license file here:
https://www.citrix.com/blogs/2011/02/01/free-netscaler-vpx-1-year-license/
——————————————————
PS: Here is a very good guide on getting the Netscaler VPX deployed… It uses Firmware 10.1, you can upgrade firmware at any time though.. CHeers!
http://adamgamble.org/2013/07/01/how-to-netscaler-10-1-deployment-part-1-initial-config/
Joseph Priolo | Systems Administrator, LifeLock, INC
CCAA, MCSE, CCNA
Thanks for sharing Joseph
My pleasure. Thank you for a quick start on XenDesktop w/ AWS! I’m about to take a test ride to evaluate for my company to have a Cloud option vs On-prem. This will help allot.
If I have time to create a “How-T- Guide” for Netsclaler for AWS I will share it here. Thanks again!
Regards, Joseph Priolo
Hi,
understand the micro instances can be run free of cost but you are setting up AD, does Amazon not charge for Directory Services?
Great post..!
I’m running AD inside of a micro so that’s still free (until you’ve used up your 750 hours).
Cheers..! gave that a bash just now. Good post..! Yet to get to the site setup etc but I thought I’d keep everything in powershell, so used PS as opposed to command file to install XenApp.
$mountiso = Mount-DiskImage C:\Users\Administrator\Downloads\XenApp_and_XenDesktop_7_8.iso -passthru
$DriveLetter = ($mountiso | Get-volume).DriveLetter
$SetupFile = $DriveLetter + “:\x64\XenDesktop Setup\XenDesktopServerSetup.Exe”
& $SetupFile /QUIET /NOREBOOT /CONFIGURE_FIREWALL /XENAPP /LOGPATH “C:\Windows\Temp\”
If ($?) {Write-Host “SUCCESS”} else {Write-Host “Check install logiles for errors”}
Thank you Eric, this is very useful. Instead of NetScaler in AWS, we also can use a OpenVPN access server to connect to the AWS VPC and the Citrix Environment works well without a Netscaler.
ofCourse, Netscaler has lots of other features, but if you need only for Remote Access or VPN tunnel, OpenVPN Access Server can be good replacement.
Thanks for the tip Ebrahim
Hi Eirik, Thank you very much for this wonderful information. Just want to know, in the last line of this article, you have mentioned, “That’s how I am Running a Citrix lab in Amazon AWS almost free of charge.” meaning, have you subscribed for amazon aws for one year? If so, we need to provide credit card details as well, correct? If you have done so, how much did they charge you for this subscription? I am planning to subscribe, but not sure about their plans and there is no customercare to call 🙁
Hi, I’m not running to much in Amazon, I would recommend Azure which now have ready-to-go blueprints for Citrix, also they have a much better calculator to show the complete costs.