
I´ve been playing around with labs hosted in the cloud for quit some time. The biggest drawback is the lack of Layer 2 Networking.
This means that since we don´t have L2 access it´s not possible to do e.g. PXE boot for MDT or SCCM. My Automation Framework works perfectly on-premise, but simply won´t run in any private cloud for that reason.
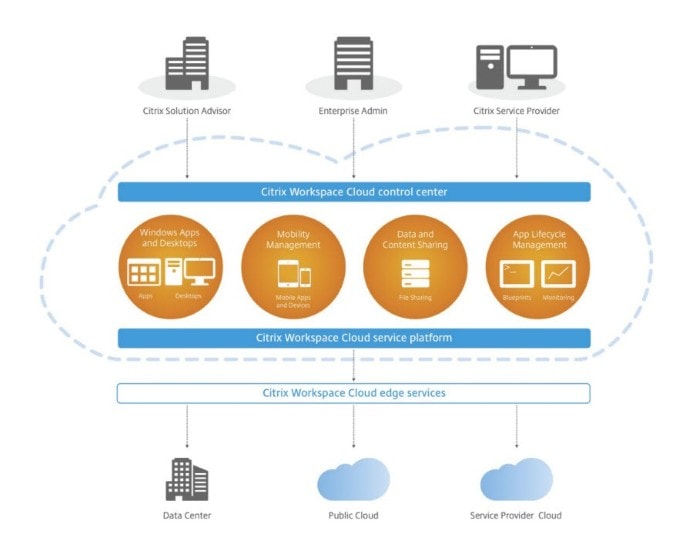
Luckily I´ve been given beta access to the brand new Citrix WorkSpace Cloud (CWC). Now with CWC you can run your workloads on-premise or in a private cloud. My Automation Framework already supports CWC, but since I want to test out private clouds as well I needed to figure out another way around for Automation.
How do we get started with Chocolatey and Boxstarter and make it Enterprise Ready? Let´s jump straight into it.
I´m going to use 2x vanilla Windows Server 2012 R2 called BS-01 and BS-02 which are joined to my domain. BS-01 is going to be the Source and BS-02 the Target.
Connect to BS-01 and download the setup from Boxstarter.

After installing Boxstarter on BS-01 launch Boxstarter Shell and install the following packages:
|
1 2 |
choco install notepadplusplus choco install nugetpackageexplorer |
You need to host your install scripts (NuGet packages) online. There´s a excellent free service for that called MyGet. Create an account and your feed. Take note of the Nuget package feed URL.

Now let’s download Chocolatey 0.9.8.3 and customize it for our Enterprise needs.
Open the file in NuGet Package Explorer and expand Tools – ChocolateyInstall. Edit the Source to point to your Nuget Package Feed URL.

Save the package and upload to MyGet.
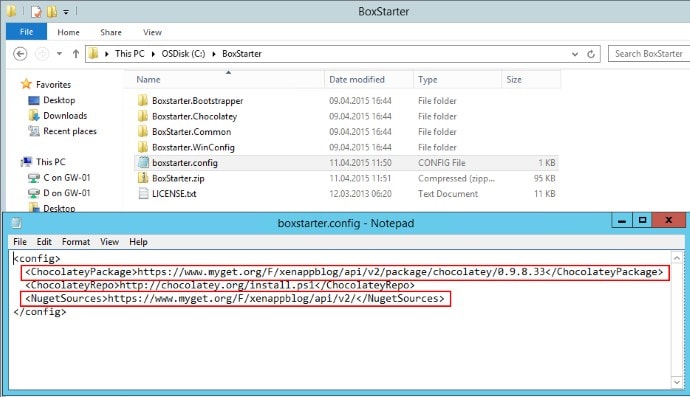
Now open %AppData%\Boxstarter\Boxstarter. Chocolatey\Boxstarter.zip and extract it to C:\Boxstarter. Then open C:\Boxstarter\boxstarter.config and change the NugetSources and ChocolateyPackage.
Why do we do this? Well, since we´re going to make this Enterprise Ready we want to have full control over our binaries and not install “unsecure” apps from the cloud like we did with NotePad++ and Nuget Package Explorer above. We also want to host the binaries on-premise so the deployment time is much faster, and most importantly so we can create custom apps that you will never find in the Chocolatey Repository.
Now rezip C:\BoxStarter to BoxStarter.zip and copy & replace %AppData%\Boxstarter\Boxstarter.Chocolatey\BoxStarter.zip.
Why do we do this? Well, when you select to deploy on a vanilla target machine that BoxStarter.zip is copied from the Source and extracted on the Target.
From Boxstarter Shell run the following commands to add your Repository and Remove Chocolatey in Boxstarter:
|
1 2 3 4 |
choco sources list choco sources add -name xenappblog -source https://www.myget.org/F/xenappblog/api/v2/ choco sources remove -name chocolatey choco sources list |
Then run the command clist to show your packages (which at the moment is none).
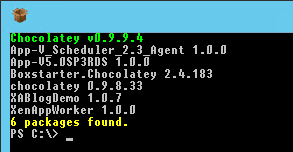
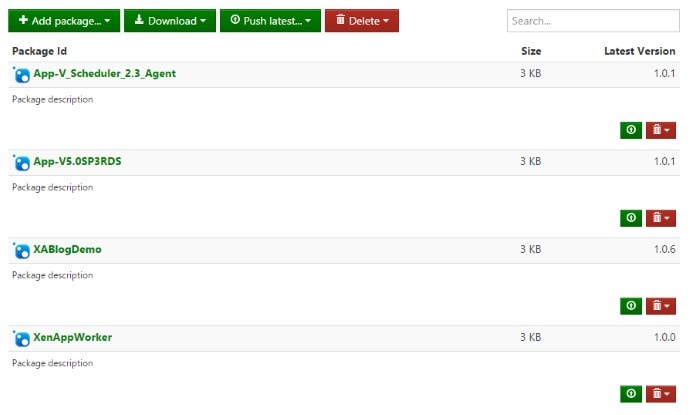
This will later reflect the packages in your MyGet account later.
Chocolatey install logics uses the environment variable ChocoRepository. So you need to create a network share to host your binaries and create the environment variable in Group Policy.

While you’re at it, make sure that you have the file server hosting the ChocoRepository trusted. If not this won’t roll because of the stupid File Security Warnings.
Administrative Templates – Windows Components – Internet Explorer – Internet Control Panel – Security Page – Site to Zone Assignment List.

The format for the binaries are $Vendor $Product $Version. If there’s no vendor like App-V Scheduler I just drop the Vendor folder.

Let’s create a package for App-V 5 SP3 RDS.
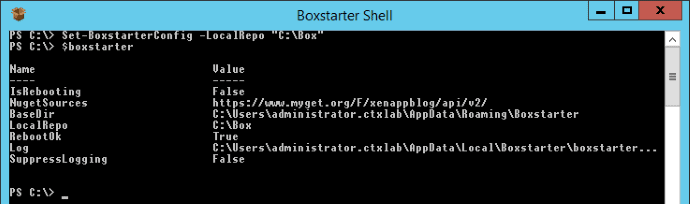
First we need to define the BoxStarter Local Repository. Let’s create a catalog called C:\Box and change the Boxstarter config.
|
1 2 |
Set-BoxstarterConfig -LocalRepo "C:\Box" $BoxStarter |
Open up NotePad++ and paste the following (Chocolatey install logics):
|
1 2 3 4 5 6 7 8 9 10 11 12 13 14 15 16 17 18 19 20 21 |
# Declaring Variables $Vendor ='Microsoft' $Product ='App-V' $Version ='5.0 SP3' $packageName = 'appv_client_setup_rds' $installerType = 'exe' $unattendedArgs = '/q /SHAREDCONTENTSTOREMODE=1 /ENABLEPACKAGESCRIPTS=1 /ACCEPTEULA /NORESTART' $destination="${env:ChocoRepository}" + "\$Vendor\$Product\$Version\$packageName.$installerType" # Running Install try { Install-ChocolateyPackage $packageName $installerType $unattendedArgs $destination Write-ChocolateySuccess "$packageName" } catch { Write-ChocolateyFailure "$packageName" "$($_.Exception.Message)" throw } |

Save it as C:\AppV5.ps1 on BS-01. Now let’s create a .nupkg packge.
Run the following command:
|
1 |
New-PackageFromScript C:\AppV5.ps1 App-V5.0SP3RDS |

Now upload App-V5.0SP3RDS.1.0.0.nupkg to MyGet.

WARNING: Please delete everything from C:\Box after upload to MyGet. If you don’t you will receive lots of strange errors when deploying!
Repeat for any other applications that you want to include in your main installation script.
Now the Citrix VDA setup requires some customization so we’re going to use some custom install logics from Julien. Remember to change the FQDN of your Delivery Controllers.
|
1 2 3 4 5 6 7 8 9 10 11 12 13 14 15 16 17 18 19 20 21 22 23 24 |
# Declaring Variables $Vendor ='Citrix' $Product ='XenApp' $Version ='7.6' $packageName = 'XenAppWorker' $installerType = 'exe' $destination="${env:ChocoRepository}" + "\$Vendor\$Product\$Version\XenDesktop Setup\" $unattendedArgs = '/quiet /components vda /controllers "xasfwp01.d2sim7.loc xasfwp02.d2sim7.loc" /enable_hdx_ports /enable_real_time_transport /virtualmachine /logpath $Log /noreboot' $log = 'C:\Temp' # Running Install cd $destination Try { (Start-Process -FilePath "XenDesktopVdaSetup.exe" -ArgumentList $unattendedArgs -Wait -Passthru).ExitCode Write-ChocolateySuccess $packageName } catch { Write-ChocolateyFailure $packageName $($_.Exception.Message) throw } |
And finally the package that installs all the Roles and Features + our packages for a Citrix XenApp Server.
|
1 2 3 4 5 6 7 8 9 10 11 12 13 14 15 16 17 18 19 20 21 22 23 24 25 26 27 28 29 30 31 32 33 34 35 36 37 38 |
# Server Roles Installation CINST APPServer -source windowsfeatures # Server Features Installation CINST DNS-Server-Tools -source windowsfeatures CINST DesktopExperience -source windowsfeatures CINST RSAT-AD-Tools-Feature -source windowsfeatures CINST RSAT-ADDS-Tools-Feature -source windowsfeatures CINST RSAT-RDS-Tools-Feature -source windowsfeatures CINST DirectoryServices-DomainController-Tools -source windowsfeatures CINST ActiveDirectory-PowerShell -source windowsfeatures CINST Licensing-Diagnosis-UI -source windowsfeatures CINST TelnetClient -source windowsfeatures CINST RemoteAssistance -source windowsfeatures CINST Microsoft-Windows-GroupPolicy-ServerAdminTools-Update -source windowsfeatures CINST Xps-Foundation-Xps-Viewer -source windowsfeatures CINST MSRDC-Infrastructure -source windowsfeatures CINST WindowsMediaPlayer -source windowsfeatures # Install Redist CINST VC2005x64Runtimes CINST VC2005x86Runtimes CINST VC2008x64Runtimes CINST VC2008x86Runtimes CINST VC2010x64Runtimes CINST VC2010x86Runtimes # Install Citrix VDA CINST XenAppWorker # Install Applications CINST App-V5.0SP3RDS CINST App-V_Scheduler_2.3_Agent |
Okay, are you ready to roll? Let’s try it out.
|
1 2 |
$cred = get-credential ctxlab\administrator Install-BoxstarterPackage -PackageName XABlogDemo -ComputerName bs-02.ctxlab.local -Credential $cred |

What’s awesome with BoxStarter is that it take care of reboots when needed.

That’s it. Might seem like a lot of work, but it’s pretty cool when you get used to it. Now that your have your Framework up it’s just adding more and more packages to your repository. Have fun.
Resources:
Hi,
How does the installation work on the distant server ( BS-02 for you)? Does BS-02 needs a internet connection to download the package and execute the script?
Thanks.
Hi Guillaume, yes the remote server needs internet connection to download the NUPKG file.
Thanks for your quick answer.
So, if there is not internet on the remote server, is it possible to keep the packages on a server and in the differents config files to write that the sources are on \\myServer\packages\myPackage ?
That what’s the blog post is all about, hosting the binaries locally but using MyGet to host the NUPKG files. But you can setup an internal NuGet server for complete offline access.
https://docs.nuget.org/create/hosting-your-own-nuget-feeds
Thanks for you last answer. I have a second question, do you know if it’s possible to configure chocolatey to use a proxy to download the nuget package? I’ve found this: https://github.com/chocolatey/choco/issues/243 but haven’t succeeded yet. Thanks.
Sorry, have not tried with proxy. Seems to be a bug, guess it will be fixed soon.