
In my blog post Running a Citrix lab in Amazon AWS I promised that I would create an similar guide for running Citrix Netscaler Gateway in Amazon AWS.
Like everything new, it takes a lot of time to learn and figure out the right steps. When working on this post I remembered back in the days when I configured my first Citrix Secure Gateway. It took me like a full week, but after repeating it over and over again I ended up doing a $5000 project in 4- 5 hours.
Now the same applies for Amazon, there’s a lot of new things to learn, because you no longer have a Networking guy to rely on. So let’s jump straight into it, be prepared this is going to be a very long post.
First we need to cover some basic Amazon acronyms:
- ENI – Elastic Network Interface
- EIP – Elastic IP Address
- VPC – Virtual Private Cloud
- Security Group – Firewall
So to be able to run Citrix Netscaler Gateway in Amazon AWS we need to create a VPC first.
From the AWS Management Console select VPC.

Click on the Start VPC Wizard.

Click Select.

We’re going to use the default IP configuration and give our VPC a name.

Then we need to create 2 more subnets for our VPC. I’m using 10.0.1.0/24 and 10.0.2.0/24. Make sure they belong to the same VPC and Availability Zone.

Now with the prerequisites completed we can head over to AWS Marketplace to install our Netscaler Gateway.
Search for Citrix Netscaler and pick the one you like best, I’m going with Citrix Netscaler VPX Platinum Edition – 10 Mbps with a 21 day free trail. This way I don’t need to worry about the licensing.
Before you Launch it with 1-Click you NEED to scroll down the page to set the correct Region and configure the VPC by clicking Setup.
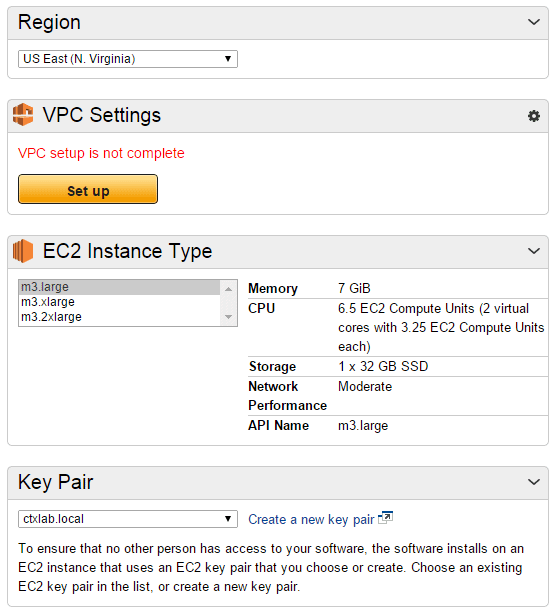
Here you see that the ENI Management Subnet is 10.0.0.0/24 (eth0) with a predefined Security Group from Citrix.
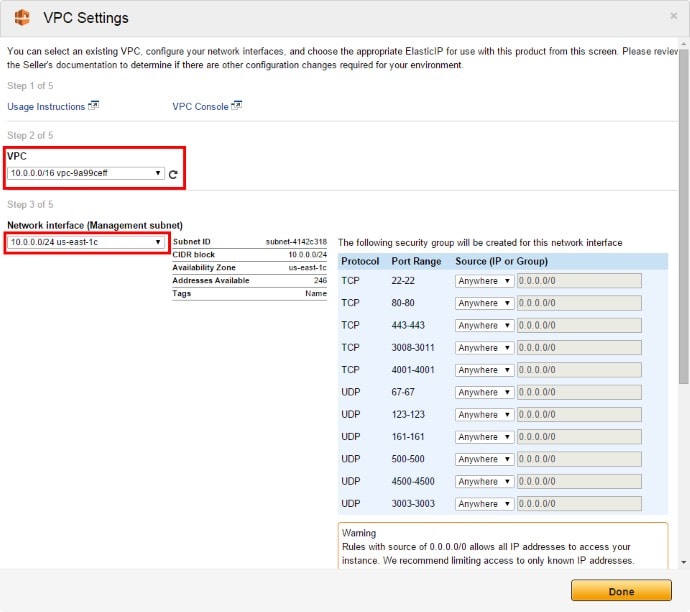
Scroll down the page to configure the other two. As you can see, there’s no Security Group configured, so by default all traffic is blocked. We will take a look at this later in the post.

Click Done and then launch with the 1 Click Button. Switch back to the EC2 Console and wait for it to complete.
When we check the Description of the instance you can see that the Citrix Netscaler Gateway appliance have 3 network cards or ENI’s like they’re refereed to in the documentation.

To be able to reach this instance we can connect through another instance (Jump Host) on the same VPC or assign a Elastic IP (EIP) to the Netscaler.
We also need another Elastic IP for the VIP so let’s create 2 Elastic IP’s. From the EC2 Dashboard click on Elastic IP’s and click Allocate New Address.
Select EIP used in VPC.

Now with 2 addresses we need to associate them to the Netscaler instance.
Select Associate Address.
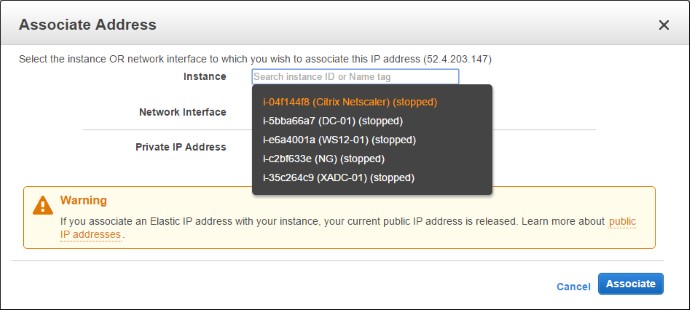

From the Description we now have 2 Public IP addresses for eth0 and eth2.


Stay tuned. If you want to learn more hosting your Netscaler in Amazon or Azure you should check out this blog http://bretty.me.uk.
Hey, thanks for the link. Great article and blog. Like the recent post about xenaerver tools. Working my way through a long list of vm’s right now!!
Thanks Dave, great blog as well, that’s why I included it 🙂 Please provide any feedback on the XenServer Tools stuff, I’m unsure about the restart, because we need that, but if forced in install script Box breaks, but you can probably add 2 task to 1 NKPUG, the XenServer tools and then check for pending reboot.
This is fabulous! Thank you! Such a great site. Is the AWS netscaler lab free?
Thanks for putting this article together. I’m a little stuck on seeing that you assigned an Elastic IP to the 10.0.0.x interface and the 10.0.1.x interface, however the 10.0.1.x interface is labelled as “private subnet” in the VPC Settings section of your launch instance wizard. It seems odd that no elastic IP is assigned to the 10.0.2.x subnet which is labelled as ‘public subnet’ in the VPC section of the launch wizard. Can you clarify this? Maybe you are ignoring the titles ‘public subnet’ and ‘private subnet’ that the VPC settings screen designate in the launch wizard. Further compounding matters, you have the description of Network Interface 2 ETH2 as “Private ENI” which makes me think you did not mean to assign an elastic IP to this 10.0.1.x interface. Was there ever a continuation of this blog? I’d really appreciate it if it got finished, there are not very many instructions out there for setting up NetScaler on AWS.
Hi, there where never a follow up post, found it to complex. Please check Dave’s blog : http://bretty.me.uk/?s=netscaler+amazon